Testing CPV One Campaign properly is crucial when running campaigns with traffic sources that accept redirects like PropellerAds, Taboola, MGID, RichAds, Adsterra, or AdCash. Unlike direct traffic sources such as Google Ads, Meta Ads, or Microsoft Ads, redirect-based networks have a unique flow that requires specific testing procedures to ensure everything works correctly before spending your ad budget.
Why Proper Testing Matters
Many affiliates make the costly mistake of launching campaigns without thorough testing, leading to:
- Lost revenue from broken tracking links
- Wasted ad spend on non-converting funnels
- Difficulty diagnosing issues once campaigns are live
- Damaged reputation with traffic sources and offer providers
The Correct Testing Procedure
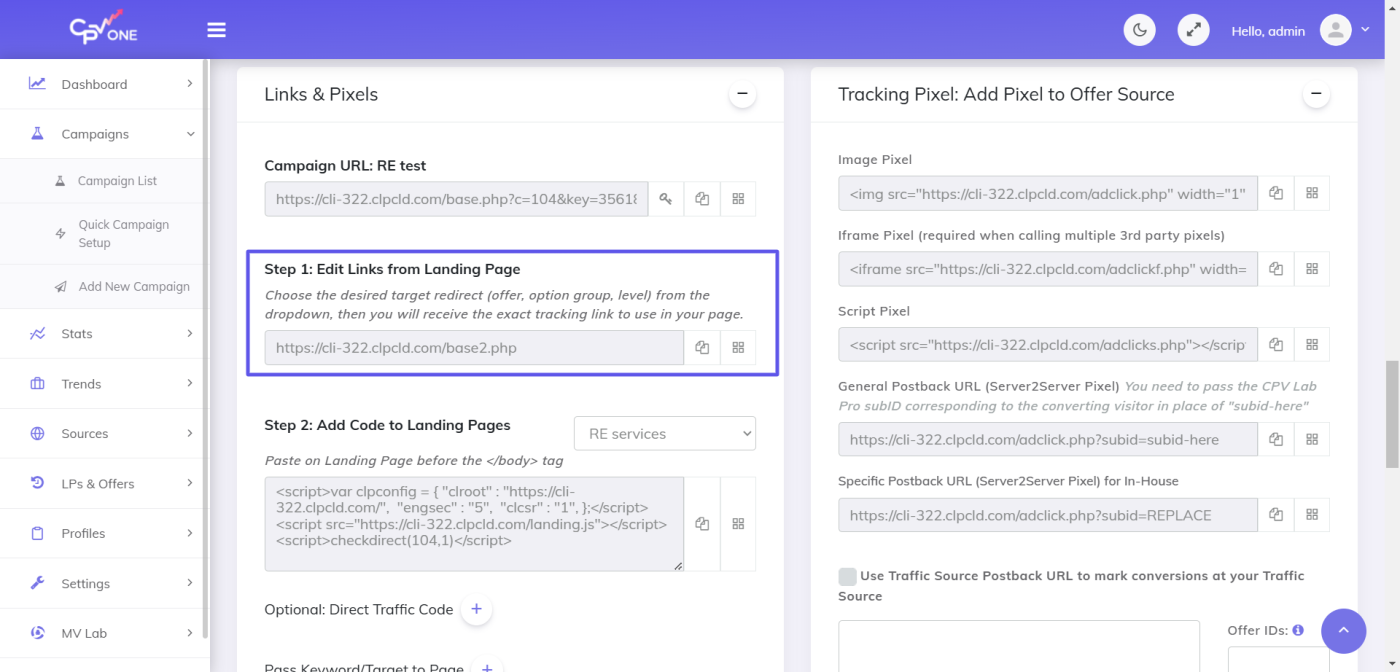
Step 1: Load the Campaign URL Link (Not the Landing Page)
Always test the Campaign URL (base.php) link rather than directly accessing your landing page.

✓ DO: Open a new browser tab and enter your Campaign URL
✗ DON’T: Skip directly to your landing page URL
This is critical because:
- The Campaign URL contains all necessary tracking parameters
- It properly initializes the tracking session
- It mimics the exact path your visitors will follow
Step 2: Navigate Through Your Entire Funnel
Once you’ve loaded the Campaign URL, behave exactly as a real visitor would:
- Examine your landing page to ensure all elements load correctly
- Click on offer links (the base2.php tracking links)
- Complete any forms on opt-in pages if your funnel includes them
- Submit test lead information if appropriate for your campaign type
- Check any email sequences by subscribing with a test email and clicking links in received emails
Step 3: Verify Tracking Data in Your Dashboard
After completing the test journey, log into your CPV One dashboard and check that:
- Your test click was recorded correctly
- The conversion (if you completed one) appears in your statistics
- All campaign parameters were tracked accurately (device, browser, geo, etc.)
- Your tokens and variables are passing correctly
Step 4: Test Multiple Scenarios
For thorough verification, repeat the testing process to account for different visitor scenarios:
- Test on multiple devices (desktop, mobile, tablet)
- Test with different browsers (Chrome, Firefox, Safari)
- Test your lander variations if using split testing
- Test each offer in your rotation if running multiple offers
Step 5: Troubleshoot Any Issues when Testing CPV One Campaign
If you encounter problems during testing:
- Check your campaign settings in CPV One for configuration errors
- Verify your tracking links are formatted correctly
- Ensure your postback URLs are properly set up with your affiliate network
- Contact support if you’re unable to resolve issues independently
Common Testing Mistakes to Avoid
- Testing only once: Always perform multiple test runs to ensure consistency
- Ignoring browser caching: Clear your cache between tests for accurate results
- Skipping mobile testing: Mobile traffic often behaves differently than desktop
- Not checking redirects: Ensure all redirects work properly and aren’t blocked
- Rushing the process: Take your time to thoroughly verify each step
Pre-Launch Checklist
Before launching your campaign with real traffic, confirm:
- ✔️ All tracking links register correctly in your statistics
- ✔️ Conversions are being properly attributed
- ✔️ Landing pages load quickly and display correctly on all devices
- ✔️All buttons and forms work as expected
- ✔️Any third-party scripts or pixels are firing correctly
- ✔️Offer pages load properly after clicking through
Conclusion
Never launch your campaign until you’re 100% confident that all settings are correctly configured. The few extra minutes spent on comprehensive testing can save you hundreds or thousands of dollars in wasted ad spend and missed conversions.
Remember that the testing process described above replicates the exact journey your actual visitors will experience when coming from redirect-based ad networks. By following this methodology, you’ll ensure your campaigns are fully optimized for success before spending your first advertising dollar.
Additional Resources
Use the campaign preview feature for a quick initial assessment before completing the testing CPV One Campaign
Contact CPV One support if you encounter any persistent issues
Consider using incognito/private browsing for the most accurate testing experience